Since I have a few followers(yippee) that I haven't met yet, I thought I would
introduce myself! My name is
Andrea or Andy, 
I am 34 and I am married to a
really cute boy named Joe.
Every day he gives me a
reason to smile. Together we have
5 energetic children. Every day they give me a reason to
smile...and cry...and scream....and wonder how in the world I am going to make it through the day. I
truly love them and am so happy I get the
privilege of being their Mommy!
I also thought I would share with you the reason that I blog.... I belong to a wonderful church organization that stresses the importance of education. I have heard many talks on the subject, and each time I do, I feel an urgency to follow this counsel and become more educated. I have really struggled with the thought because my children are so young and financially it just isn't the best time. I have felt impressed that I should develop my interests and talents at home until it is a more appropriate time. I really love to refurbish furniture and I love interior design. Although I feel inadequate, I think it is a blast to learn and try new things. Blogging about them helps me to stay motivated and helps me to get (hopefully honest) feedback about what works and what does not. The blogging world also gives me incredible ideas and inspiration. I sincerely appreciate that you would take the time to look at the my little projects!
I was introduced to a couple of
fun blogs this week.
Lisa has some
awesome learning activities for kids. She has some really fun projects that give you some productive, quality time with your little ones! Also my neighbor
Cassie has a really fun blog for moms. She has a
different focus each day. She has some great ideas and wisdom to share!
Stay tuned this next week, I am attempting a boys room. My son really wanted a black bedroom. We comprised and decided to try gray with black accents.
We'll see how it goes. I think the colors will look pretty together, I'm just a little nervous that they might end up looking elegant instead of boyish. Maybe we'll throw red in there too. If you've seen any gray bedrooms that have worked please send me a link! Here's the headboard I bought at DI for $15.

So boyish right??? I'll be painting it black tomorrow along with a farmhouse shelf above the window. Wish me luck!! I'm gonna need it!


 Mine is actually all gone, so I'll just set them on top of each other to give you an idea of what it looks like.
  The plates and the candle stick cost me $2 at DI. They also have really cute plates at Thai Pan Trading Co. I made my mom a fancier one for $11. Not to bad! Could be a Mom's day gift.
 I didn't think it was as secure as I wanted it to be, so I also put some staples around the edges.
  After it was covered I put another coat of Mod Podge on top of the fabric and used the drill press to create holes for hanging and for the pegs.
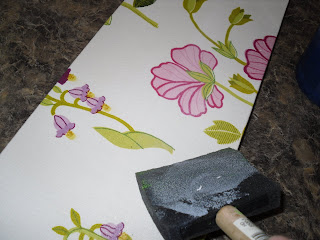 I painted the pegs green and voila! A quick cute place to hang coats.
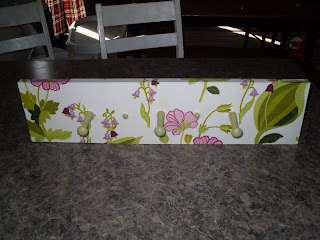 I would have liked to make it bigger, but my piece of fabric wasn't very large. I think it might be fun to go to the fabric store and find some really cute pieces of fabric to try it on.
 It's really interesting to try and find a few different things that you can piece together. My hubby helped me get the stripped screws out of the table and I brushed painted the top of the table and the legs a light green. I sprayed the metal support black so it would match the mirror and lamp. I sprayed the frame for the mirror and stuck some vinyl lettering on top. It's good practice for me to try and figure out our new machine.
 I'm actually selling this set on
  I think if I made this again I would stretch fabric tightly across the back and staple instead of using Mod Podge because you can see the reflection of the glue if when it is in light. I had to put this up so it wouldn't be close to window light.
  I saw these house numbers in a magazine that Kathy gave me and thought they were really adorable on a blue door. I like it on my green one as well!


 Need something to inspire you today? Check out

 The key is a good taping job and it doesn't hurt to paint over the tape with the original color of the door(if you have it)before you paint to create a crisp line. You can also use glaze if you don't have the right paint color. I like to use a sponge brush rather than a roller because there isn't texture on doors, so the roller leaves bumps. In my boy's room I didn't tape off the grey at all, I just painted it and then taped the black on top of it. The lines were already there for me which made it easier, but doors can also look very cute with the whole thing painted. Here are some great examples from an awe inspiring site called


 OK, so today my projects are going to have to be cleaning cleaning and more cleaning...but I thought I'd show you my entry way shelf with decorations on it.
 I actually thought that the wrought iron piece would fit inside the shelf, but I have really bad depth and size perception. Since it didn't fit I decided to try and stack it by putting a couple screws in the side of the shelf and hanging it. The Porter sign is something that a friend made for me years ago and it has been all over the house and back again. I found these cute little candle holders at D.I. for a buck and painted them black.
 Ok...I guess I should get started on the floors. Good luck with all of your lovely housework today too.


 They have had it for a really long time so I wanted to do something really cool with it. When she gave it to us a couple of the legs were broken or getting there. By the time we got home with it ALL of the legs were broken. Joe glued them for me and we had the table sitting in my front room. I even liked it unpainted just because it has such a cool shape to it. I put it on my "To Do" list for today. I had an image in my mind of what I wanted it to look like, and to be honest, I really didn't think it was going to turn out the way that I had hoped it would. I painted the base and the lip of the table black.
  I really wanted triangles so the top would look like pizza slices.
  I found a long enough straight object that I could trace my lines and then I taped each triangle and painted it.
  Of course looking back it would have been much easier to just paint it all light green and then only have to tape around 4 triangles. Live and learn right?? Here is the end result!


 No, I don't decorate my kids rooms

 The most expensive part of this transformation.....


