Tuesday, August 19, 2014

Chalkboard signs~


This window was broken, so I replaced the glass with a pieces of chalkboard.  
I had intended on just using it for messages, but I really do love having a black smooth surface for vinyl, so I turned it into a sign.  I guess it can still be used for little messages as well...perhaps sharing moments of our day that make us happy.  


This is another chalkboard sign. The frame is made out of barn wood.  
The inside edge was routed so the sign would fit nicely inside.  


This vinyl is for sale for $5+shipping if you'd like to recreate this project. It fits on a 9" square.

And finally, a chalkboard that can actually be used as a chalkboard! This antique window was $2 at a garage sale.  I fell in love with the panels and the gorgeous original hardware. 


Thursday, May 29, 2014

Kitchen Island Transformations~

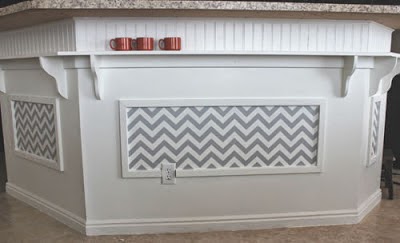
4 years of living in this house and the kitchen island is screaming,
"LEAVE ME ALONE!!!!"


Wednesday, May 28, 2014

Scrappy Headboard~

A few years ago, I wanted to dress up our room a bit by making a headboard. 
I loved the look of oversized headboards, but I've never been a fan of the oversized price.

To accomodate a tight decorating budget, I created the look of a large headboard 
by tacking trim to the wall and painting the inside.

Really easy and pretty inexpensive. 
You can check out the post HERE.


The only problem with this type of headboard is that you can't move it around. 
That can be a challenge for a girl who likes to change things up frequently.

After a couple of years, it was time to add a bit more oomph.

I raided the garage and found a bunch of scrap pieces of wood. 
I made sure they were all about 1/4'' thick, but I used all sorts of different kinds of scraps.
Beadboard, pegboard, mdf, whatever I could find.

I figured out the hard way that it was best to listen to my husbands suggestion and start at the top.
All of the pieces in a horizontal row need to be the same width.
 They can and should be different lengths.

Attach one horitontal row at a time and work your way down the wall.


I tacked  the pieces up with a pnuematic nail gun.
It took awhile... and the nail gun and compressor scared the crap out of my dog. 
She hid in my closet for the duration of the project.


Here is a picture of the finished headboard. 
I love the new look! Clean and shabby at the same time.

Feel free to try this at home.
You just have to be happy with the fact that your bed will never ever ever move again...:)


Come Unto Christ Vinyl~


Come unto Christ vinyl $5+Shipping.
Shipping for up to 4 vinyl decals is $4
Pictured on a 12'' square board that is not included.
VINYL ONLY
Black or white vinyl available.

Email for a PayPal invoice
andy@poppiesatplay.com

Tuesday, February 25, 2014

Let's grow old together

I listened to a talk this weekend about making your spouse the most important person in your life, only second to God.  It really touched my heart and made me question myself.  Am I giving my best time and attention and energy to my husband? Probably not. Can I improve? Most certainly.  Is it worth the effort? YES! I want to hold on to the love that we have. I want to make it stronger.  I want to grow old with my true love and share every part of my life with him.  I want to spend years creating our laugh lines together and when I look at my wrinkly self in the mirror, I want to smile and think of the memories we've shared and our future together.  


Monday, January 20, 2014

Door Craft


I had the opportunity to go to ReStore the other day. It's such a cool place. They are a nonprofit organization that accepts donations of building materials for homes. They use their profits to help build homes for people. It's pretty amazing and a perfect place to shop if you're looking for doors.

I picked up this paneled door for only $20.  


I was planning on using for an entryway coat rack, but after holding it up in the intended spot, I  didn't love it there. It looked better in our front room. Not as functional, but I liked how it looked on the gray wall better than against our white hallway.

I put vinyl flowers and birds in the panels to dress it up.


I was a little worried that it would feel too busy for me because of the high bookshelves, but I really do like it. It's a fun focal point for the room.


Thursday, October 31, 2013

Happy Halloween!

 Happy Happy Happy


Halloween!
Love,
Shrek and Fiona

Monday, September 23, 2013

Shelf/Pegboard/Sign Thingy

For this project I used a 15''X24'' piece of 3/4'' mdf 
and a few scrap boards that I had lying around garage.


I routed a rectangular piece of wood for a shelf
 and made support triangles as well as a support beam.
I glued the and nailed the shelf together and then set it aside.


Before I attached the shelf to the board, I pre-drilled some holes for pegs and hanging holes.
I measured the middle of the board and the middle of the shelf to figure out where to nail the shelf to the board. 

Here's what it looks like with the shelf attached...


with pegs and paint...


and vinyl...


If you would be interested in slapping this vinyl onto a project of your own, 
you can shoot me and email and order it!
andy@poppiesatplay.com

It's about 10.5'' wide and 13'' tall.

The cost is $5+ $4 Shipping. 
Shipping for vinyl is $4 for up to 4 different vinyls, so check out the other options if you'd like to save money on shipping.

Have a happy Monday!

Thursday, August 22, 2013

New Vinyl Designs

Happiness List

White vinyl for sale. Click HERE for pricing.


Welcome Trick-or-Treaters!


Black vinyl for sale. Click HERE for pricing.

Friday, June 14, 2013

Here Comes the Bride~

Here comes the bride vinyl.

#1
Pictured on a 9.5'' X13.5'' board.
$6+Shipping
(Vinyl only)

#2
Pictured on a 16''X9'' board.
$6+Shipping
(Vinyl only)

If you are interested in ordering, shoot me an email and I'll send you a paypal invoice.
andy@poppiesatplay.com

Shipping for vinyl is $4 for up to 4 vinyl designs.  
Check out ordering details or other styles of vinyl HERE.

Tuesday, June 11, 2013

A few Summer projects~

I probably won't be an amazing blogger throughout the summertime, 
but I'm excited to share a few projects that I've been working on.

I've been playing around with vinyl, trying to find a cute design for our address. 
I didn't really like the size for my door, so I stuck it on our entry bench.


This beautiful secretary was given to me by my Mother-in-law. She found it in San Fran way back when The Joe was a little boy. I love that she kept it for all of these years and carried it with her through all of her many moves. I started painting it last year and then got majorly burnt out, so it sat...and sat..and sat in my storage.  


 Here it is, finished and functional in our office. It's such a great catchall with all of those little cubbies.


Now that Summer is in full force, I also wanted to brighten up the living room shelf with some happy decor.  I totally forgot that I had this lemonade sign! Sometimes it's nice having a crappy memory because you're always discovering new fun things around the house! Lol.  


I hope you're enjoying the sunshine!

Monday, May 20, 2013

Think Happy Thoughts Sign~

I made this sign for my daughters room a couple of months ago.
She's kind of a worrier at night, 
so I wanted to give her something fun and happy to look at as she goes to sleep.


I took 3 pieces of scrap, ripped 2X4's. 


Measured and drilled holes. 


I used a pencil as a spacer to make sure it would look even after I twisted the craft wire through the holes.

Made myself a little heart stencil and painted it pink.


And topped it off with vinyl. 


Think happy thoughts!

Saturday, May 18, 2013

Easy DIY Cupcake Stands~


We had a birthday party for my in-laws recently and I made a couple of cupcake stands for the event.


I started with 4 boards. 
The biggest was a 12'' square and I chopped off an inch and a half off of each of the other boards 
tiering up to the smallest.  


I also cut (3) 5'' pieces of PVC pipe for each stand.  
The size of the boards and the length of the PVC can be adjusted to fit your project, 
just make sure that you have enough room to comfortably display your cakes.


I found the center of the boards by tracing diagonal lines across each square.


I eyeballed the position of the PVC pipe and traced it. 


Tracing the pipe gives you a guide line for your glue.
I used E-6000. I was a somewhat skeptical that it would adhere to wood and PVC, 
but I let it dry for 24hrs and it was completely solid. 


My SIL had some old wooden napkin rings that she was getting rid of, so she let me use them for my feet.  You could use wooden dowels or whatever you can find to raise the stand up off the ground an inch or two.  

After painting, I hot glued ribbon around each board.


Of course it's not possible for me to tie a decent looking bow, so these are made with 4 different pieces of ribbon.  One big loop with a smaller loop glued around the center and two separate pieces trailing from the back. 


Each of them can easily hold 30 cupcakes.